and it's not maintained in JDeveloper as it normally would be when developing the portal with WebCenter Portal Framework.
In Portal Builder it is possible to customize a set of out of the box System Pages:
These pages are common for all portals, and they can be customized to meet our requirements. For some of them is also possible to create different page variants for different mobile renderings. The system pages we are usually interested to modify are:
- Login page
- Welcome page
- Error encountered page
- Page Not found
- No Page accessible
We are interested in the first 2 pages of this list, Login and Welcome pages.
Both pages contain login functionality, but the redirection to welcome page happens after logout and when I try to access the homepage of WebCenter portal (i.e. hitting the hostname:port
So in order to provide a custom login page we will have to customize both pages; for simplicity, we will apply the same customization for both (we could otherwise customize the welcome page putting a link to the login page, to have the login components only in one page).
The solution proposed here consists in developing a custom login ADF Task Flow, which will contain the fragment with the login components.
This task flow will be then deployed to Portal Server as part of a shared library, which will be referenced from WebCenter Portal via the Portal Extension project.
To read more about how the Portal Extension work, refer to the Oracle documentation.
To properly write the code for the new login page, it's useful to have a look at how the OOTB Login task flow provided from WebCenter Portal. To access the code, it's enough to have the 'WebCenter Spaces View' library in the classpath in JDeveloper, then in the spaces-web.jar file access the fragment:
oracle.webcenter.webcenterapp.view.taskflows.security.LoginFormView.jsff
in this page you can copy paste some of the components you need in the new fragment, making sure to maintain the same EL expressions, in order not to lose any functionality.
For example, you may end up with something like this:
<?xml version='1.0' encoding='UTF-8'?>
<jsp:root xmlns:jsp="http://java.sun.com/JSP/Page" version="2.1"
          xmlns:f="http://java.sun.com/jsf/core"
          xmlns:trh="http://myfaces.apache.org/trinidad/html"
          xmlns:af="http://xmlns.oracle.com/adf/faces/rich">
 <af:subform id="loginForm"
     defaultCommand="#{(o_w_wa__i_v_w_Login.OAMEnabled || o_w_wa__i_v_w_Login.WLS)
                       ? 'submitLogin' : 'submitLoginiServlet'}">
    <af:panelGroupLayout  id="logfrmpgl1" layout="vertical" inlineStyle="width:1000px">
    <af:outputText id="opt2" rendered="#{sessionScope.o_w_wa_loginFailedText}"
                   value="#{uib_o_w_w_r_WebCenter.SORRY_INVALID_USERPASS}"
                   inlineStyle="color:Red;" binding="#{sessionScope.o_w_wa_loginFailed}"
                   clientComponent="true"/>
    <af:panelFormLayout inlineStyle="white-space:nowrap;" id="logfrmpfl1">
    <af:panelLabelAndMessage label="#{uib_o_w_w_r_WebCenter.LOGIN_USER_NAME}"
                             labelStyle="color:black" styleClass="loginfield" id="logfrmplam1">
      <f:verbatim>
        <input type="text" id="username" name="j_username"
               maxlength="200" class="WCInputText" size="30" autocomplete="off"/>
        <input type="hidden" id="wcEncoding" name="j_character_encoding"
               value="UTF-8"/>
      </f:verbatim>
    </af:panelLabelAndMessage>
    <af:panelLabelAndMessage label="#{uib_o_w_w_r_WebCenter.LOGIN_PASSWORD}"
                             labelStyle="color:black"  styleClass="loginfield" id="logfrmplam2">
      <f:verbatim>
        <input type="password" name="j_password"
               maxlength="50" class="WCInputText" size="30" autocomplete="off"/>
      </f:verbatim>
    </af:panelLabelAndMessage>

    <af:commandButton id="submitLoginiServlet" partialSubmit="false"
                      styleClass="logbtn"
                      disabled="#{security.authenticated}"
                      rendered="#{!(o_w_wa__i_v_w_Login.OAMEnabled ||  o_w_wa__i_v_w_Login.WLS)}"
                      text="#{uib_o_w_w_r_WebCenter.LOGIN_LOGON_BUTTON} ">
      <af:clientListener type="action" method="wcPostLoginForm"/>
    </af:commandButton>

    <af:commandButton id="submitLogin" partialSubmit="false"
                      action="#{o_w_wa__i_v_w_Login.LoginAndNavigate}"
                      styleClass="logbtn" disabled="#{security.authenticated}"
                      rendered="#{o_w_wa__i_v_w_Login.OAMEnabled || o_w_wa__i_v_w_Login.WLS}"
                      text="#{uib_o_w_w_r_WebCenter.LOGIN_LOGON_BUTTON} "/>

    <trh:script id="edvkloastar94" text="
        function wcPostLoginForm(event)
        {
          var form = document.forms[0];
          form.action = 'wcAuthentication/j_security_check';
          form.submit();
          event.cancel();
        }
      "/>
    </af:panelFormLayout>
    </af:panelGroupLayout>
 </af:subform>
</jsp:root>
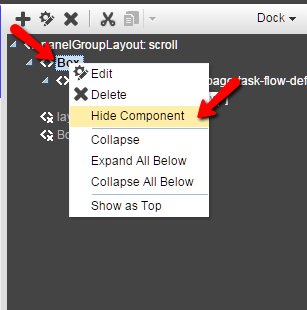
After the TF is correctly packaged into a WAR shared library and deployed to Portal Server, you need to make sure the Task Flow is available in a resource catalog. To see how to edit a resource catalog at runtime, please check the Oracle documentation.
Save the page and close.
You can also customize the task flow itself from the structure pane:


No comments:
Post a Comment